They use old t-shirts to make superhero costumes for their children, of course! Sweetie Pie is nearly 3 and is invited to a 5 year old's superhero themed birthday party this weekend. Baby boy is going along, so they both need costumes. For Wonder Woman, this is what I started out with:
 |
| Red shirt Mr. Fresia has had for 14 years, and I've NEVER seen him wear. Blue shirt was purchased at the thrift store for $2. |

Shows the section cut off to make the top of the bodice.

Used the bottom of the shirt to be the top of the costume.
The hem showing in this photo will later by covered, so it doesn't really matter.

I just cut the back at a slight angle, then folded it over,
added elastic to make it a tight enough fit (I guessed at the elastic size).

Cut off the bottom 10 or 11 inches of the blue shirt,
folded over and sewed to make a waist, added elastic.
(again, guessed on the elastic size)

Sewed the blue to the red (later, I had to make the red part shorter,
all because I used the drop-waist dress as my pattern).

Starting on the spats to cover her shoes and look like Wonder Woman's boots.
I measured her leg for this.

I had white leftover from another sewing project for this.
My original plan was thin bias tape, but turned out I already had
some pre-folded and sewed, so I used it.
The top is white fabric ironed onto heavy interfacing.

I bought iron-on stars, because I REALLY didn't want to try
to cut out a bunch of stars and make them look good.
At $2/5, it was the most expensive part of the whole project.

The part I dreaded the most: how to make the fits-over-the-shoe part.
I leaned heavily on "tracing bigger than what you need" and
"elastic will make it fit".

So far, so good. . .

This shows all the elastic use that I was so heavily dependent on.

All sewn together.
I'm not wild about the pulling,
but I'm not really sure how to fix that.

Beginning of the adding-the-gold part.
I bought the gold when I bought the stars,
just a half yard, and ironed onto heavy-weight
interfacing to make it easier to work with.

Sewing shot: you didn't know this was a sewing blog, did you?

Last shot I took for the tutorial.
I wanted the costume from Linda Carter as Wonder Woman,
and I have to admit, I'm a wee bit disappointed,
I think mine looks a little too much like a spider,
rather than eagle-like. But sometimes you've gotta say,
"hey, this IS for a 5 year olds birthday party, enough already".
Or listen when your husband says it to you.
If you look at the finished photo of Wonder Woman at the top of the page, you'll see her wrist bands and crown, which I totally forgot to photograph while I was working, but were really easy to make (simple folding and cutting, then folding and sewing, adding on an iron-on star or two).
Through the miracle of blogging, Baby Boy's costume went super fast:

From this
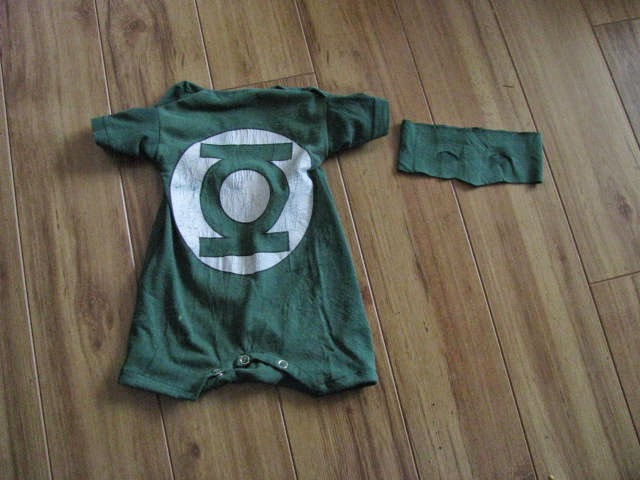
To this.
Seriously, I finished the whole thing during the sweet spot of simultaneous napping (which does not, by the way, happen more than once or twice a week around here). It's a little tight across the chest, but it'll work great for Saturday.
So, there you go! Art teacher projects for summertime!